QUICK, EASY INSTALLATION
The Välinge 2G Angle/Angle system is a patented locking profile for installing flooring planks without using glue.
TuffCore WPC Installation Guide
TABLE OF CONTENTS
[01] GENERAL JOBSITE/HOME CONDITION
[02] IN-FLOOR RADIANT HEAT REQUIREMENTS (HYDRONIC SYSTEM ONLY)
[03] IN-FLOOR RADIANT HEAT MOISTURE BARRIERS AND RETARDERS
[04] GENERAL INSTALLATION SPECS
[05] GENERAL SUBSTRATE CONDITIONS
[06] APPROVED SUBSTRATES
[07] ACCLIMATION (FOR RADIANT HEAT SEE “IN-FLOOR RADIANT HEAT ACCLIMATION REQUIREMENTS” SECTION)
[08] EXPANSION REQUIREMENTS
[09 FL] APPROVED FLOATING METHOD (ESTATE UNILIN DROP-N-LOCK SYSTEM)
[10] HOW TO PROTECT THE FLOOR DURING & AFTER INSTALLATION (DURING CONSTRUCTION)
The intended end user and the installer should have a clear understanding of expectations of the color, installation, and layout of flooring. Carefully inspect the products before installation for any milling, dimensional, or visual defects. If the flooring supplied does not satisfy the customer, do not proceed to install. The decision not to proceed must be made within the first 10% or 100 sq ft of the flooring boxes opened, whichever comes first. Open boxes exceeding this amount will not be eligible for return.
TO AVOID COSTLY INSTALLATION MISTAKES ONLY INSTALL FLOORING IN ROOMS UNDER ADEQUATE LIGHTING CONDITIONS
[01] GENERAL JOBSITE/HOME CONDITION
Important: The requirements listed below are considered standard practices for the flooring industry and are required by most building codes. Following these simple guidelines will greatly extend the life of any fixture in the jobsite/home. Local building codes may vary and will prevail.
- It is the jobsite/homeowner’s designated installer responsibility to inspect flooring prior to installation. Inspect every plank for inconsistency with the finish, texture, milling, color, graining, tongue and groove integrity, dimensions, and the suitability of the flooring product to its environment. Flooring products installed with pre-existing defects or that were incorrectly acclimated CANNOT be claimed after installation.
- Verify there are enough materials to complete the job with a minimum of 2% extra for future plank replacements.
- Allow a minimum of 5% waste for culling, shipping damage, and for on-the-job waste.
- Make sure the crawl space has at least 18” clearance from the dirt to the bottom of the beams. Remove all cardboard from the concrete walls, pillars, and footings as it will trap and hold moisture. The entire crawl space must be covered with a minimum of 6 MIL plastic (puncture resistant) vapor barrier with all seams overlapped 18” and fully sealed with a moisture proof tape.
- To prevent excessive moisture buildup, all crawl spaces must have a minimum of 1.5 sq. ft for every 100 sq. ft of crawl space at the exterior of the house for cross ventilation or an air exchanger will be needed. It may be necessary to install temperature/humidity activated exhaust fans to create air movement in the crawl space.
- Drainage from roofs, rain gutters, and other sources of moisture around the jobsite/home must be directed away from the site.
- All exterior doors, windows, drywall, painting, and venting must be properly installed prior to the delivery of the flooring to the jobsite/home. Do not store material in exterior sheds, garages, or rooms that are not temperature controlled.
- All heating and cooling systems are required to be installed and functioning for at least 14 days before installation of the flooring begins.
- Use a hygrometer that reads temperature and RH (relative humidity) to check jobsite/home heating and cooling systems. They must be able to maintain a minimum of 30% to 60% RH and 55° to 85°F before, during, and after the flooring installation.
- Small humidifiers are not capable of properly maintaining the humidity levels in large jobsites/homes. Your local heating and cooling air service contractors can provide information for automatic humidifiers/dehumidifiers that work with your heating and cooling systems.
- Vinyl flooring is not recommended to be installed in any area of the jobsite/home that has extreme temperature and moisture fluctuations. For example: saunas, hot tub/pool rooms, green houses, exterior porches, or garages.
- Since flooring is not compatible with wet conditions, the manufacturer does not warrant against moisture related issues or related damage under their warranty.
[02] IN-FLOOR RADIANT HEAT REQUIREMENTS (HYDRONIC SYSTEM ONLY)
Visit www.my-nfp.com for the current list of products that are approved for in-floor radiant heat. There are unique installation requirements for flooring installed over radiant heat. Prior to installation, it is the responsibility of the jobsite/homeowner designated installer to check with the manufacturer for a current list of approved installation methods and underlayment requirements. All warranties are based off installation and maintenance guides published on our website at the time of your installation.
IN-FLOOR RADIANT HEAT SYSTEM REQUIREMENTS:
- Only flooring that is clearly marked approved can be installed over in-floor radiant heat.
- Only hydronic in-floor radiant heat systems with failsafe capabilities to ensure the boiler does not exceed 110°F and the surface temperature does not exceed 85°F are approved.
- Operate the in-floor radiant heat system for at least 14 days prior to the flooring being installed. All moisture in the substrate MUST be evaporated off. This will also ensure all systems are in good running condition.
- To prevent expansion and contraction issues related to the in-floor heat system, a humidity control humidifier must be installed and properly functioning one week before, during, and after the installation for the life of the floor.
- Transition strips/breaks are required over in-floor radiant heat substrates exceeding 35 feet lengthwise and widthwise.
- Important: Leave a 1/2” expansion gap around all walls, tubs/showers, plumbing fixtures, exterior doors, large Sub Zero style refrigerators or appliances.
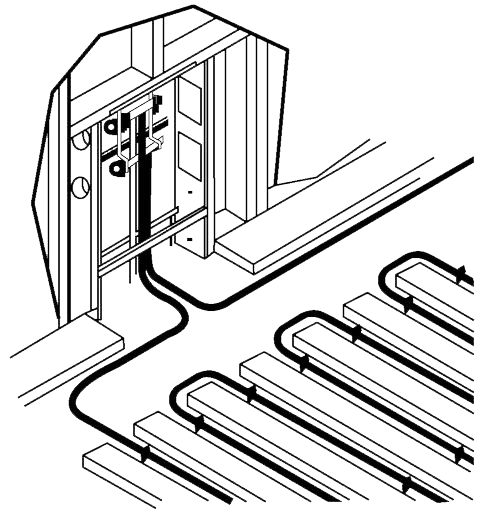
- The in-floor radiant heat systems CANNOT be installed directly below the flooring. The heating element must be embedded a minimum of 1/2” into the concrete, gypcrete, or installed under the wood subfloor. This will ensure the radiant heat is evenly distributed across the substrate before the heat comes into contact with the flooring.
IN-FLOOR RADIANT HEAT ACCLIMATION REQUIREMENTS:
- Do not deliver the flooring to the jobsite until all environmental conditions have been met.
- Always acclimate the flooring in the temperature-controlled room where it will be installed.
- During acclimation, do not remove the material from the box or lean boxes on walls. Only stack the boxes squarely on top of each other, no taller then 3’, and keep the stacks a minimum of 3” apart.
- It is required to reduce the subfloor surface temperature down to 65°F a minimum of 72 hours before, during, and after the installation.
- Acclimate for a minimum of 48 hours in the temperature controlled room it will be installed or until the material reaches room temp.
- After the installation, raise the temperature slowly to desired conditions. It is not recommended to raise the temperature up or down more than 5°F in a 24 hour period.
- To prevent the floor from overheating or trapping moisture, never cover the flooring before, during, or after installation with any type of non breathable or excessively thick rugs, mats, solid surface items, plastics, or a mattresses that are laid directly onto the floor. It must be allowed to breathe.
IN-FLOOR RADIANT HEAT APPROVED INSTALLATION METHODS:
- See approved substrate portion of this guide for all substrate requirements.
- Floating installations are approved for substrates with in-floor radiant heat.
- Glue down installations are approved for substrates with in-floor radiant heat. Be sure to follow the adhesive manufacturer’s substrate requirements for surface preparations, moisture testing and mitigation, primers for concrete/ gypcrete, and installation instructions. Bond warranties come solely from the adhesive manufacturers.
[03] IN-FLOOR RADIANT HEAT MOISTURE BARRIERS AND RETARDERS
The type of moisture barrier is usually based on the installation method and substrate. Different types of moisture barriers produce the same end result by doing it in different ways. Check with local building codes and the manufacturer of the radiant heat systems for recommendations.
WPC WITH ATTACHED CORK (IN-FLOOR RADIANT HEAT):
- Below, On, or Above Grade Concrete & Gypcrete Slabs: Cover the entire slab substrate with 6 mil plastic with all seams overlap per 12” and taped with moisture proof tape.
- Wood Subfloors: A moisture barrier is not required over a finished basement or a crawl space that meet the “General Jobsite/Home Condition” requirements.
Prop 65 Warning: Drilling, sawing, sanding, or machining wood products generates dust, a substance known to the state of California to cause cancer. Use caution during the removal or sanding of existing flooring or other building materials as these may contain hazardous fumes, chemicals, or generate harmful dust. Check the substrate for any health hazards. Always wear safety equipment and approved dust mask.
[04] GENERAL INSTALLATION SPECS
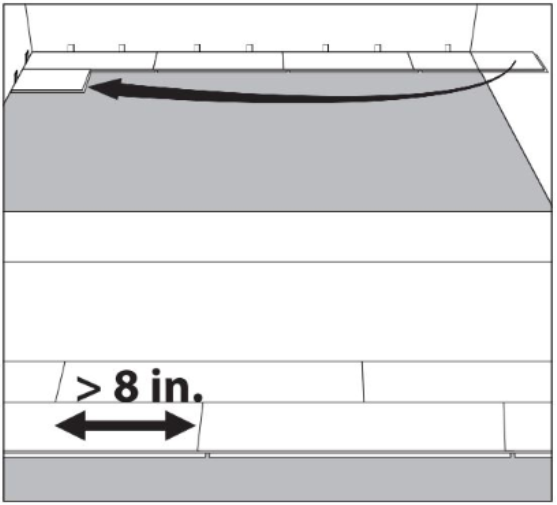
- Avoid installing flooring plank pieces less than 8” in total length against walls or on ends. Stagger end joints no less than 8”.
- It will generally be necessary to saw some flooring panels during installation. To obtain a clean cut, the pattern side should face down if using a jigsaw, saber saw, or circular handsaw and face up when you use a handsaw, table saw, or crosscut saw.
- Before installation begins, use a jamb saw to undercut all door casings (1/16” between door casing and top of flooring material) and vertical objects coming off the floor. To achieve the correct height, combine a piece of the vapor retardant and flooring together to use as a guide for the saw. Be sure to clean out all debris from under the jambs. This will allow the flooring to slide underneath the object for a clean, and professional look.
- Contractors: When setting door casings post-installation of the flooring material, make sure there is adequate space for the flooring material to expand and contract without any hindrance.
- Never fasten nails, screws, or anything through the flooring into the substrate. The floor MUST be allowed to float freely.
- For a perfect finish around pipes, use rosettes in places where profiles or skirting cannot be placed.
[05] GENERAL SUBSTRATE CONDITIONS
- All substrates must be flat and free of dust, loose particles, paint, drywall compound, and must be structurally sound.
- Sand and/or flatten the substrate to within 3/16” dip or rise in 10’ or 1/8” dip or rise in 6’ radius.
- If leveling of the substrate is required, use only cement-based leveling compounds. Be sure to follow the leveling compounds manufacturer installation guidelines.
- WPC flooring can be installed over wood sub-floors that are ON or ABOVE GRADE and over concrete or gypcrete substrates that are BELOW, ON, or ABOVE GRADE.
- When walked on, the substrate must not exceed 1/4” deflection in a 6’ radius, or more then a 1/16” between the floor joist. If it does, this condition must be corrected before any product installation begins. If not corrected, the subfloor will not stiffen up after the flooring is installed.
- Always check and repair any loose, delaminating, or broken substrates.
- Hand-held angle grinders with special cupped diamond grinding wheels and vacuum attachments can be rented or purchased from your local rental or home building center. This system works well with any type of substrate. Use precautions when sanding any surface. Check the substrate out for any health hazards. Always wear safety equipment and approved dust mask.
[06] APPROVED SUBSTRATES
PLYWOOD/OSB:
- Do not install over wood subfloors that test above 12% MC (moisture content).
- Note: If installing new wood subfloors from lumber yards, be sure to test the MC. Typically, they have higher levels of moisture and may need to acclimate longer. Issues caused by this condition are not covered by any manufacturer warranty.
- Fix all squeaks coming from the wood subfloor prior to installation. Use wood screws, minimum of 2-1/2” lengths, fastened every 6”, through the wood subfloor into the joist. Squeaks in the subfloor will not go away after the floor has been installed.
- Acceptable minimum wood subfloor thickness is determined by the distance between the joists/trusses. Vertical deflection must be under 1/4” in a 6’ radius when walked across.
-
- When joists are 16” o/c or less; minimum acceptable thickness is 5/8” CDX plywood or nominal 3/4”, OSB 40LB Minimum density, T&G, with a TECO or APA certification stamp.
- When joists are 16” o/c up to 19.2” o/c; minimum acceptable thickness is 3/4” plywood or nominal 3/4”, OSB 40LB Minimum density, T&G, with a TECO or APA certification stamp.
• When joists are 19.2” o/c up to 24” o/c; minimum
acceptable thickness is 7/8” plywood or nominal 1”,
OSB 40LB Minimum density, T&G, with a TECO or
APA certification stamp
CURED CONCRETE/GYPCRETE: (6MIL PLASTIC VAPOR BARRIER IS RECOMMENDED TO AVOID MOISTURE RELATED ISSUES)
- Cured concrete must be over 3000 PSI. Cured gypcrete must be over 2500 PSI.
- All concrete or gypcrete substrates must be cured for a minimum of 60 days before any flooring product is ever installed over them.
- Concrete moisture testing should be performed by ASTM F1869 Calcium Chloride Tests with levels NOT exceeding 5LBS per 1000 ft2 for a 24 hour period, or an ASTM F2170 In-Situ relative humidity test with readings exceeding 80%.
- Gypcrete dries very fast so Maxxon recommends using the mat test or Delmhorst #B2100 moisture meter.
- Test the concrete subfloor for alkalinity. (The pH of the floor must be between 5 and 9).
PARTICLE BOARD (UNDERLAYMENT-GRADE):
- Some adhesive manufacturers will warrant a WPC floor glued down over underlayment-grade particle board. Follow their glued down installation instructions since the bond warranty would come solely from them.
- The only manufacturer recommended installation method that can be used directly over underlayment-grade particle board is the floating method as long as there are no current or future moisture concerns from below or above. If moisture comes in contact with the particle board, it may swell. The product warranty does not cover subfloor upheavals.
OTHER APPROVED SUBSTRATES (FLOATING ONLY): (ALL MOISTURE CONTENT, FLATNESS AND DEFLECTION REQUIREMENTS WOULD APPLY.)
- Ceramic, porcelain, or natural tile with the grout joints filled flat with Portland based patching material.
- Single layer of clean, well adhered, non-cushioned, full spread glued sheet vinyl, or VCT. All embossing must be feathered filled with suitable filler patching compound.
UNACCEPTABLE SUBSTRATES:
- Solid or engineered wood floors over concrete.
- Floors that are floating, cushioned, perimeter glued, carpet, carpet pad, lumber subfloor, or subfloors that are sticky.
- ACQ treated plywood or exterior low density OSB sheeting used for general construction.
[07] ACCLIMATION (FOR RADIANT HEAT SEE “IN-FLOOR RADIANT HEAT ACCLIMATION REQUIREMENTS” SECTION)
- Installing flooring before it has properly acclimated will greatly increase the chances of expansion and contraction issues and may make it more difficult to install.
- Do not deliver the flooring to the jobsite until all environmental conditions have been met.
- Always acclimate the flooring in the temperature-controlled room where it will be installed.
- During acclimation, do not remove the material from the box or lean boxes on walls. Only stack the boxes squarely on top of each other, no taller then 3’, and keep the stacks a minimum of 3” apart.
- A 48 hour acclimation period is required.
- During installation floor temperature should be within 65-85°F.
- Ensure flooring planks are at or near the room temperature of where the flooring is being installed at .
- Never cover the flooring before, during, or after installation with any type of plastic or tar paper. It must be allowed to breathe. Use only breathable floor protective construction paper (FortiBoard) to protect the flooring.
- Propane heaters are not an approved source of heat and can give off extreme amounts of moisture. They also do not provide a reliable and consistent source of heat. In fact, for every gallon of propane or kerosene that is burned, they both will put approximately 1.1 gallons of moisture into the ambient space. The manufacturer warranty will be void if the jobsite/home heating and cooling system were not fully operational at the time of installation.
- HVAC must be installed and running prior to the installation of
the floor covering.
[08] EXPANSION REQUIREMENTS
- Leave a minimum of 1/4” expansion gap for all installations under 20’ lengthwise or widthwise. For installations exceeding 20’ lengthwise or widthwise, add 1/16” per additional 5’of length or width, up to 5/8”. For example: 25 linear feet would be 5/16” expansion gap.
- T-molds are required for rooms exceeding 40 lineal feet in length and width and 35 lineal feet for installations over in floor radiant heat.
- Never install cabinetry, islands, or other permanent fixtures on top of a floated floor.
- Never use nails to secure anything to the floor. The floor must be allowed to float.
- Leave the required expansion gap around all walls, tubs/showers, plumbing fixtures, and large Sub Zero style refrigerators, exterior doors, etc.
- Once the floor installation is complete, remove all spacers that were used to maintain the expansion gap.
- Heavy furniture (500+ lbs) may obstruct the free, natural movement of a floated floor. Restricting this movement in certain areas can lead to problems such as buckling or separation when the floor experiences natural expansion and/or contraction.
[09 FL] APPROVED FLOATING METHOD
(MARKET AND MAIN VALINGE 2G ANGLE/ANGLE)
The Valinge 2G Angle/Angle system is a patented locking profile for installing flooring planks without using glue.
- The panels are clicked together on the short side until the row is completed then the entire row is engaged on the long side.
- Be sure to inspect all edges and remove debris from the click before installing.
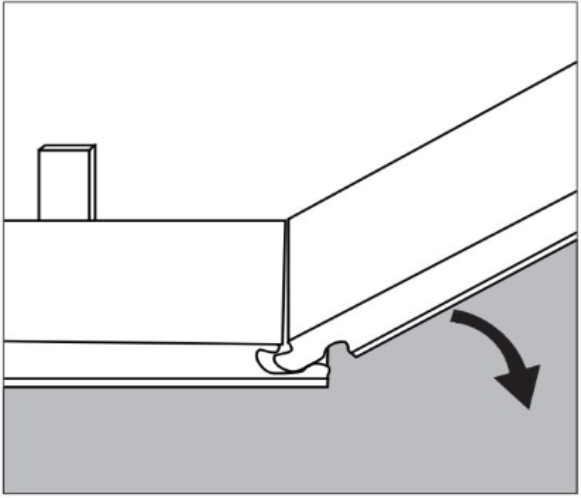
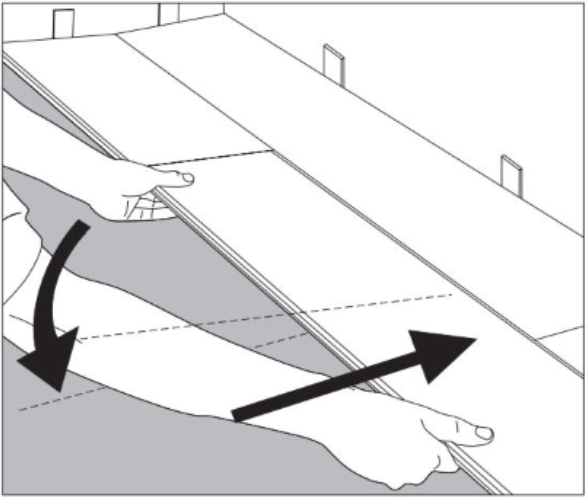
- Either side of the panels are engaged at an angle of 20° to 30° to the panel already installed. Move the panel gently up and down while exerting forward pressure, and the panels will automatically click into place. Then lay the plank down to the floor.
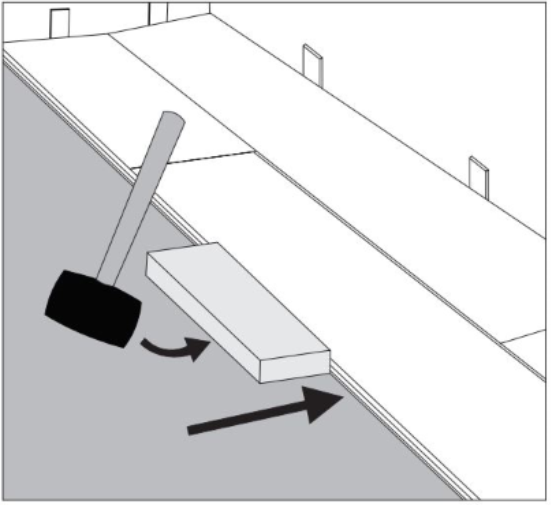
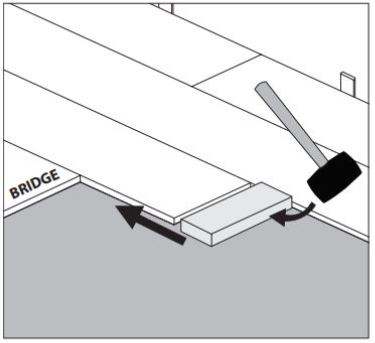
- As you install the click flooring, ensure all seams are fully engaged before moving on to the next row. Visually, a row can appear to be engaged but is not. To avoid this, use an approved tapping block to tap the short side then the long side of the planks together. This will securely engage the locking system.
[09 GD] APPROVED GLUE-DOWN METHOD
(MARKET AND MAIN WITH ATTACHED CORK)
APPROVED ADHESIVES:
- Follow all substrate, moisture content, and expansion requirements outlined in section 1-8 of this guide.
- All adhesive and bond warranties come solely from the adhesive manufacturer. Follow all of the adhesive manufacturer guidelines regarding installation requirements.
- Use a good quality polymer-based adhesive like Tuffgrip PS99 Modified Transitional PSA or equivalent.
- Depending on the application the trowel size will vary. Follow the adhesive manufacturer’s recommendation for 7.5mm WPC with attached cork. Using the full spread method, be sure that the adhesive is adhered completely to the bottom of the flooring.
- Periodically check to make sure the trowel notches are clean and not worn out. Also, verify there is adequate glue transfer to the back of the planks.
- It is not recommended to glue WPC flooring down over particle board subfloors unless the glue manufacture approves it. Either remove the particle board or install new 1/4” thick plywood over the particle board, then install the new floor over the plywood.
- Be sure to remove wet adhesive from the surface before it dries and damages the finish. Most adhesives can be cleaned off of the floor surface with WF Taylor Touchdown #9 adhesive remover on a terry cloth rag, followed by a rinse with clean water on a rag. Do not pour cleaning products or adhesive removers directly onto the floor. Always test the cleaner before attempting to clean the floor.
GLUE DOWN TIPS:
- Working off the longest straight wall (typically an exterior wall), snap a chalk line parallel with the wall that is equal to the width of the flooring plus enough room for the expansion gap. Use spacers to maintain the proper expansion gap.
- If using the glue down method, keep the groove side facing out.
- If needed, use only green/blue 3M/Scotch Tape model #2080 to hold the floor together while the adhesive is drying for a minimum of one hour and no longer then 24 hours. Do not use duct tape or packing tape as they can damage finishes.
- Allow the first rows to dry for a minimum of one hour before installing additional rows. This will ensure a solid and straight platform to install the next rows against.
- Avoid heavy foot traffic on the floor for a minimum of 24 hours to allow the glue to set properly.
- Once the floor installation is complete, remove all spacers that were used to maintain the expansion gap.
DO NOT WET OR CLEAN FLOOR FOR A MINIMUM OF 72 HOURS. THIS WILL ALLOW THE ADHESIVE TO CURE PROPERLY.
[10] HOW TO PROTECT THE FLOOR DURING & AFTER
INSTALLATION (DURING CONSTRUCTION)
The Valinge 2G Angle/Angle system is a patented locking profile for installing flooring planks without using glue.
- After each section of flooring has been installed and thoroughly cleaned, cover the floor with a breathable protective construction paper (FortiBoard). Do not apply the tape directly to the surface of the flooring, it may damage the finish.
- During construction, vacuum the floor as often as it takes to keep the floor free of dirt and construction debris. Never use a beater brush.
- If drywall repairs or any type of sanding is needed, thoroughly cover the floor. These types of dust and grit can damage the floor’s finish and are very difficult to remove if they get into the joints. Do not wet mop these types of dust. Always use a vacuum without a beater brush to remove any construction dust if needed.
- Before furniture goes onto the new floor, apply approved 3/16” thick heavy-duty felt pads under all furniture feet.
- Furniture with metal or hard plastic rollers or casters are NOT APPROVED for use on vinyl flooring.
- Never roll or drag anything heavy over the new floor. It will make indentations or scratches in the surface. When moving objects, always use a soft-tire dolly, a carpet piece turned upside-down, or an air-sled.
Note:
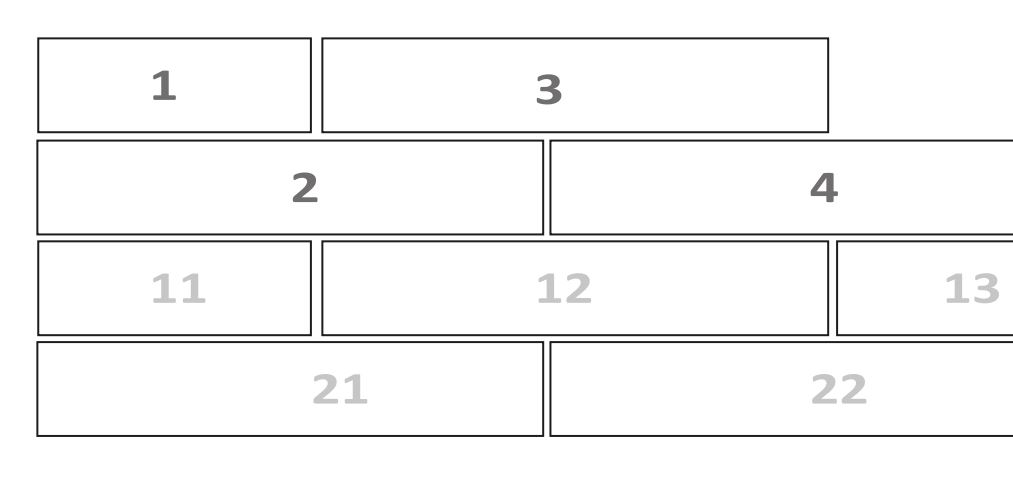
Products should be staggered in bricklaid pattern, stagger equal to half of a plank for the first four rows, and randomly from row 5 on. Tools needed: pull bar, spacers, soft-faced hammer, and tapping block.
FIG. 1
Leave a minimum of 1/4” expansion gap for all installations under 20 linear feet and add 1/16” per additional 5’ of length for installations exceeding 20 linear feet. For example: 25 linear feet would be 5/16” gap. Maximum continuance distance without t-mold transition is 40’ width or length. Insert spacers to create proper expansion gaps at ends and edges where the planks will meet the walls and any vertical objects.
FIG. 2
Start the first row by inserting the short end of the plank (tongue first) into the groove at an 20 to 30° angle, then rotating downward to lock it in place. Continue laying planks to establish the first row.
FIG. 3
Use a cut piece to start the second row. NOTE: End joint spacing must be at least 8” for all adjacent rows.
FIG. 4
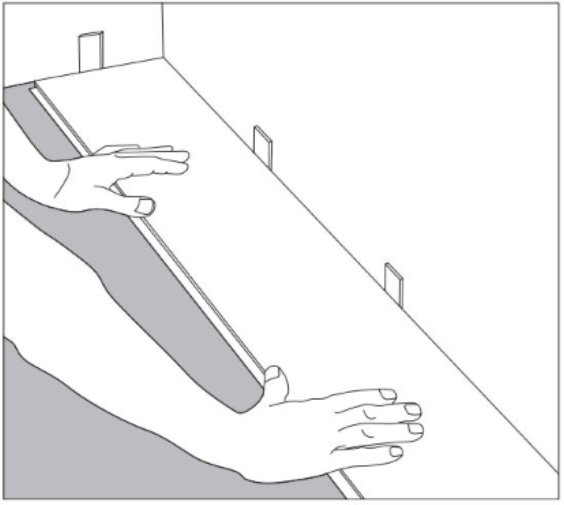
For additional rows, engage the locking system on the short side of the last plank installed by inserting the tongue at an 20 to 30° angle, then rotating downward. Slide this plank toward the long side of the previously installed plank, then engage the long side of the plank. Lift the other side up slightly, and push or pull the plank together until it clicks together.
FIG. 5
Use a scrap piece of flooring as a tapping block and tap on the long edge of the plank to ensure that the locking system fully engages.
FIG. 6
Use a cut piece to start the second row. NOTE: End joint spacing must be at least 8” for all adjacent rows.
FIG. 7
Using a scrap piece (with a factory end joint) as a tapping block, tap the end of the plank to engage the locking system. Be cautious to not damage the locking profile when tapping. Continue installing until you reach the end of the row.
FIG. 8
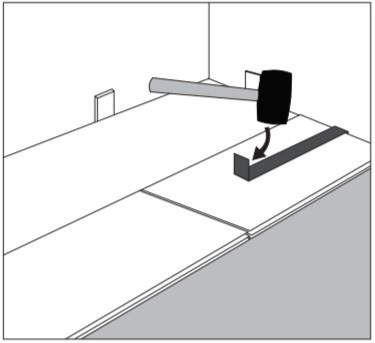
At the end of the row, use a hammer and pull bar to engage the locking system of the final piece in the row. Install a spacer at the row end. Repeat this process until the final row of flooring.
At the final row, use the hammer and pull bar to lock the long edges of the planks as well as the row ends.
When completed, pull all spacers and double check to ensure there is the required expansion gap.

